Call Now 866.456.9326 or Sign Up for a free 14-day trial! Terms of Use   Privacy Policy   Site Map

Enter Your Hours Logo

Complete Billing Software

Quickbooks Integration McAfee Secure sites help keep you safe from identity theft, credit card fraud, spyware, spam, viruses and online scams
Online Payments
Online Time Sheet Billing Software

Deactivating and Reactivating Clients

Table of Contents  > Managing Clients > Deactivating and Reactivating Clients

Navigate to the Client Screen, and make sure you have the Client List tab selected. To deactivate a client, click the trash icon at the end of target client's row.

Note the highlighted column:

You might be wondering why clients are deactivated and not permanently deleted? If the client was associated with any other records such as invoices, bills, and payroll, then deleting the client permanently would cause errors and inconsistent data. Also, it’s possible for someone to purposefully (a rogue employee for example) or accidently delete a client that should not have been deleted.

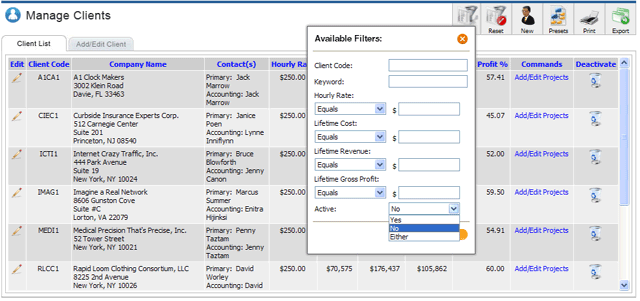
To reactivate a client, use the Client List filter to search for deactivated clients, by choosing Active = No.

Client List Filter:
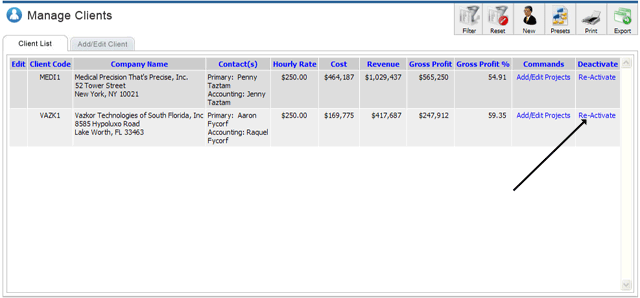
The resulting list will now show a Re-activate link, which you can click to reactivate the client.

Note the last column now show Re-Activate links:

Related Topics:
Managing Clients: Quick How To
Working with the Client List
Client Detail Page: Explanation of Fields
Adding/Editing a Client
Project Presets
Client / Worker Rate Overrides
Blocking/Unblocking Clients from Workers
Filtering/Search/Sorting Clients
Printing the Client List
Exporting the Client List


Home |  Free Trial |  Features |  Software Reference |  Tours & Tutorials |  Pricing |  FAQ |  Quickbooks Integration |  Terms of Use |  Privacy Policy |  Site Map |  Blog

Enter Your Hours, LLC © 2008 - 2009. All Rights Reserved.
7/1/2025 6:29:40 AM